
Savant Pro Remote Troubleshooting Guide REM-1000
Troubleshooting
For REM-1000 Pro Remotes (these steps do not apply for REM-1100 or REM-2000 Wi-Fi Pro Remotes):
Place the REM-1000 into the Remote Base.
Confirm Remote Base charges the Remote.
Ensure the Remote Base is provisioned on the same network as the Host.
Ensure the Remote Base UID is properly entered in the configuration.
Important! Each time the da Vinci software is updated on the Savant Host, the Host will scan for Savant devices on the network, comparing the firmware version running on the Pro Remote Base with the firmware packaged with the updated da Vinci software. If a newer firmware version is available, the update process will start automatically.
Common screen messages and their meanings
Connecting… - Remote is unable to communicate with the Base. Refer to Case #6 in this guide.
Awaiting Config - (REM-1000 units only) Either the UID is not entered properly in the configuration currently loaded on the Host, or the Remote Base has not been provisioned to the same network as the Host.
Status LED (Bottom of Remote Base) meanings (REM-1000 Only)
Solid (Green): The Base is provisioned to the local network and communicating with the Savant Host.
Blinks Once (Green): The Base is provisioned to the local network but not communicating with the Savant Host.
Blinking Yellow/Green: Firmware is updating on the Base.
Solid (Yellow): The Base is booting.
Blinks Once (Yellow): The Base is in Access Point Provisioning Mode and ready to be provisioned to the local network.
Rapid Blink (Yellow): The locate feature was activated. From the SmartConnect App tapping the Remote Base entry in the Devices in Bluetooth section will activate the locate feature. The LED will blink for 5 to 7 seconds.
Rapid Blink (Red): If the reset button on bottom of Base is held down for at least 5 seconds, the LED will begin a rapid blink (red). When button is released, the rapid blink will stop and the Base will reboot to the factory default settings.
Reset Remote Base to Factory Default (REM-1000 Only)
Insert a pointed object (preferably non-metallic) such as a spudger tool into the reset button pinhole located on the Remote Base. Press and hold the Reset button on the Remote Base for 5 seconds until the LED begins to rapidly blink (Red), then release the reset button.
Important! Do not insert any object into the hole next to the Power button on the Remote. This is the Microphone.
LED will switch to solid yellow while Base reboots.
After the reboot (5-10 seconds), the Status LED starts blinking yellow once per second indicating it is in Access Point Provisioning Mode and ready to be provisioned with the local network settings.
If the above steps did not resolve the issue, review the specific cases below.
Specific Cases
Case #1: Remote does not respond
Symptom
Remote does not respond. When placed on the Base to charge, the following screen is displayed.

Resolution
There is a problem with the battery. Contact Savant Support and open a Support Case on the Savant Community. Create an RMA Case with Required RMA information and include a detailed description of the symptom. NOTE:This is applicable to both Savant and Pro 8 Remotes.
Case #2: LCD Screen is missing pixels or malfunctioning
Resolution
Launch Debug Menu (See Debug Menu section).
Tap Manufacturing Test.
Tap LCD to launch the LCD test and complete.
Complete the LCD test.
If the situation persists, contact Savant Support and open a Support Case on the Savant Community.
Case #3: Hard buttons not functioning
Resolution
Launch Debug Menu (See Debug Menu section).
Tap Manufacturing Test.
Tap Button to launch the hard button test.
Complete the button test.
If the situation persists, contact Savant Support and open a Support Case on the Savant Community.
Case #4: Voice Commands not functioning
Resolution
Press and hold the Voice Command button for the Green circle to start spinning.
Say loudly and clearly "Voice Commands"
If the green processing circle fails and displays "Sorry can you say that again", open a Support Case on the Savant Community. If the wrong command is selected, verify the following:
Ambient noise volume is at a minimum
Nothing is obstructing the microphone on the remote
Command is spoken loudly and clearly
If the situation persists, contact Savant Support and open a Support Case on the Savant Community.
Case #5: Remote Stuck on Connecting (REM-1000 Only)
Resolution
Ensure Host and Remote Base are on the same local network.
Confirm LED status indicates Remote Base is successfully connected to the Host. (LED is Green)
Obtain the Bluetooth Address of the Remote Base. (see Finding Bluetooth Address section)
Power off the Remote by pressing and holding the Power button until red circle completes and the Remote shuts off.
Launch in Debug Menu (see Debug Menu section)
Tap Diagnostic and a screen similar to the one below displays: Example:
Verify that the Base Address matches the Bluetooth Address that was obtained.
If the Remote displays a different Base Address value than the Base Address it is supposed to be paired to, confirm that the Remote is on the correct Base.
NOTE: If the Remote displays either the Base Address or Remote Address values shown below (including the x's) within the Diagnostic Menu, contact Savant Support and open a Support Case on the Savant Community. Create an RMA Case with Required RMA information and include a detailed description of the symptoms.
Note: The Base Address can be reprogrammed at this time, if necessary. Double-check first that the Remote has not been accidentally paired with the Base of another Remote on site. (See the Set Base MAC Address section.) For additional support, contact Savant Support and open a Support Case on the Savant Community.
Press lower left arrow to get out of this menu and go back to the Debug Menu.
Tap Manufacturing Test.
Press reset button on the Remote Base. This will start the Remote to Base communication test. Confirm that the Base is powered up. The LED status on the Base is not important at this point.
Bluetooth Enabled will display for a short time and then disappear.
NOTE: If there are values in the Manufacturing Test then the Base and Remote are communicating appropriately. The Remote should now be fully functional. If there are no values in the Manufacturing Test -> Remote Base, contact Savant Support and open a Support Case on the Savant Community. Example Result:
DIAGNOSTIC MENU
Base Address
28:C2:9D:E3:7F:3B
Device Address
28:C2:EE:8A:FF:3A
Reset
DIAGNOSTIC MENU
Base Address
28:C2:DD:xx:xx:xx
Device Address
00:1A:AE:xx:xx:xx
Reset
Device MAC Address:
Device MAC Address:
xx:xx:xx:xx:xx:xx
28:C2:DD:2F:34:B8
1. –xx
1. –45
2. –yy
2. –46
3. –zz
3. –47
Average: –ww
Average: –46
Exit
Exit
Case #6: Remote powers off when removed from Base
Resolution
Verify Remote turns on as expected when seated on Remote Base.
Remove Remote from Base.
If the Remote immediately powers down, create an RMA Case with Required RMA information and include a detailed description of the symptom.
Case #7: Remote displays a VIDEO icon instead of service icon, while the Pro App displays correct service icon
Resolution
This occurs when the Pro Remote firmware is out of date. Follow the steps below to force a firmware update.
Power down the zone the Remote belongs to.
Power down the Remote.
Place the Remote into the Remote Base.
Power on the Remote.
Monitor the update progress within System Monitor through the Controller Info tab.
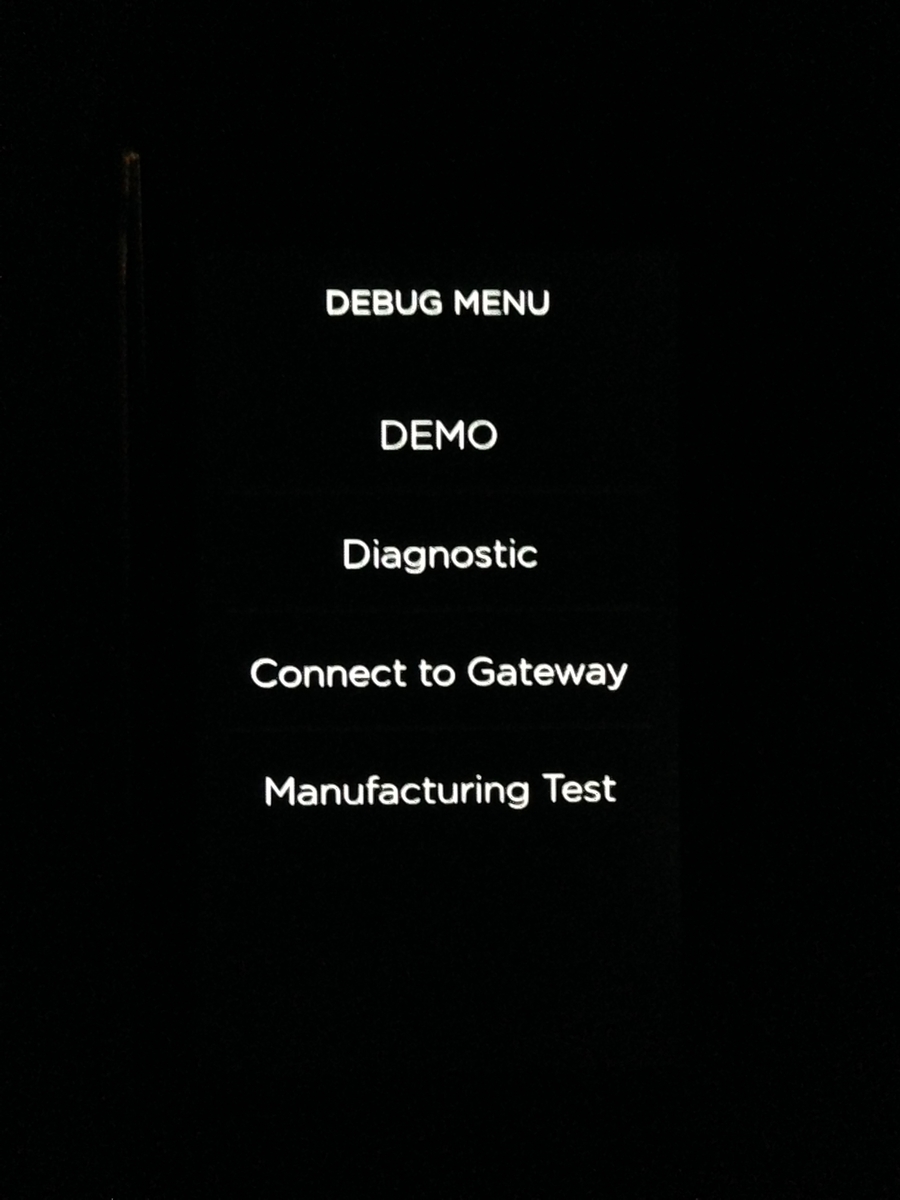
Debug Menu
This will be required for most of the tests in this Troubleshooting Guide. To put the Savant Remote into Debug Menu follow these steps:
Power down the Remote.
Press and hold the Mute, Last and Power buttons simultaneously until the remote button backlight comes on.
Release the Power button, but continue to hold the Mute/Last buttons.
The Remote will launch the Debug Menu screen. (See example image below).
Enter DEMO Mode
DEMO mode is entered from Debug Menu. To exit DEMO mode, restart the Remote.
Enter Debug Menu (see Enter Debug Menu section above).
Tap DEMO.
Tap Start Demo. This will restart the Remote in DEMO MODE.
Selecting Demo Mode will launch the Savant Pro Remote interface with an example system loaded, which shows off some of the features and layout elements of the Pro Remote UI without the need for a live system connection. By default, Demo Mode is set to off.
To set the remote to launch in Demo Mode every time it is powered on, set the Permanent option to On.
To exit permanent Demo Mode, follow the same steps to open the Remote Debug Menu, then set the Demo Mode's Permanent option to Off.
Debug Menu - Diagnostic
This launches a screen with specific information about the Remote.
Enter Debug Menu. (See Enter Debug Menu section)
Tap Diagnostic.
DIAGNOSTIC MENU
Base Address
28:C2:9D:E3:7F:3B
Device Address
28:C2:EE:8A:FF:3A
Reset
Base AddressDisplays the MAC Address of the Base.Device Address
Displays the MAC Address of the Remote.
Reset
Factory Reset. Restores all settings to factory default.
Debug Menu – Connect to Gateway
This is a test used during manufacturing to test communication between the Remote and Remote Base with the REM-1000-xx model of Savant Pro Remote. This test has no real application once the Remote has been set up in a system.
Debug Menu – Manufacturing Test

Touch
Touch launches a diagnostic test to check the functionality of the Touch LCD screen.
LCD
LCD launches an LCD test for the LCD screen on the Remote. This test is best used if there are missing pixels or other screen issues. (See Case #2)
Remote Base
Remote Base launches a test that will return a relative strength level between the Remote Base and the Remote.
Bluetooth
Bluetooth launches a test primarily used by manufacturing to check the Bluetooth connectivity between the Remote Base and the Remote.
Recommended Wi-Fi Settings
Here are the recommended Wi-Fi settings for optimal Savant communication:
Standalone 2.4GHz network with unique SSID. Do not name the same as the 5GHz network.
'Band Steering' is disabled.
In certain applications, creating a unique SSID per WAP is beneficial so that the devices do not roam.
'Fast Roaming' is disabled.
WPA2 encryption with TKIP/AES set to Auto.
Disable any automatic channel assignment / "Smart Select" features. Instead, use a Wi-Fi scanning utility to determine the best static channel assignment (often 1, 6, or 11).
Set Channel Width to 20 MHz.
Disable any bandwidth throttling or traffic shaping logic.
NOTE: The settings suggested above are intended particularly for the REM-1000 Bluetooth Pro Remote and Base. Newer models may be capable of supporting 5GHz network bands.
Finding Bluetooth Address (REM-1000 Only)
The following process assumes that the REM-1000 is already deployed into the Savant System and the Remote Base is currently configured with an IP address. If the Remote Base is not configured with an IP address on the network, please refer to the REM-1000 Deployment guide.
Open rpmEmbScanner from within Savant Application Manager (For more information see Savant Application Manager version 3.2 (SAM) - Reference Guide)
Using the IP Address of the base, find the UID of the Remote Base. Example: 28C2DDA51D13001F
Take the UID value and remove the last 4 characters. Example: 28C2DDA51D13 (001F is removed)
Change the last character to the previous character using the parameters below. Example: 28C2DDA51D12
NOTE: These Addresses are in hex. This is a Base 16 number system. It counts as follows: [0, 1, 2, 3, 4, 5, 6, 7, 8, 9, A, B, C, D, E, F] To subtract one, move left a single position on this line.
Set Base MAC Address
If the pairing of the Remote and the Base is incorrect follow the steps:
Enter Debug Menu. (See Enter Debug Mode section)
Tap Diagnostic.
Tap the Base Address field
Enter the correct MAC Address.
Required Case Information
Case Summary: Short statement of the issue. (e.g. REM-1000 does not ___________________, after following REM-1000 Troubleshooting Guide.)
Case Details: Supply all confirmed information below:
Troubleshooting steps
List of steps completed with test outcomes, while trying to resolve issue.
Configuration (in Blueprint select: File > Archive Config with Themes…) Upload compressed file to the Case
Networking Information
Confirm Network gear (What are the Wireless Access Points / Router)
Wi-Fi Encryption Method (WEP/WPA/WPA2, etc.)
Wi-Fi SSID
Confirm IP Address of REM-1000
Logs (with Processes elevated)
REM-1000
Master Host
Redundant Host (if applicable)
Required RMA Information (Final step for RMA process)
Serial Number or Savant Sales Order Number
Shipping Address (Commercial or Residential)
Shipping Method: Standard or ASAP (additional fees may apply)
Advanced Purchase Order Number
Model Number of product being returned
Last updated