This section outlines all prerequisites and requirements which must be met before beginning the configuration of the Ring device.
Before Beginning
Read this document in its entirety, and ensure that the following required items are available:
A Ring device (Ring Video Doorbell Pro, Video Doorbell Elite, Floodlight Cam, Spotlight Cam, or Stickup Cam Elite)
Savant Pro App for iOS and Android, version: 9.4 or higher
Savant Host with runtime software: da Vinci 9.4 or higher
Savant Development Environment (SDE / MacBook) running MacOS 10.14.6 or higher
Profile: Ring - (Entry and Security Camera Service: Ring Video Doorbell Pro, Video Doorbell Elite – Security Camera Service: Floodlight Cam, Spotlight Cam, or Stickup Cam Elite)
2. Licensing
One Ring Feature (SFL-RING1-00) License must be applied to the Savant Host via Savant Central Management (SCM) for each Ring Video Doorbell Entry or Security Camera device on the site prior to deployment and activation of the feature. Licenses are purchased via the Savant Store, then imported or transferred to the Job for the site within SCM. This section details the process for applying the required licensing to the Savant Host and assumes that the Host has been deployed, is connected to the Savant Cloud, and has been claimed and added to a Job within SCM by the installer.
Refer to the Savant Central Management (SCM) Reference Guide (009-1724-xx), available on the Savant Community for more information on SCM, Domains, Jobs, and cloud-based license management.
NOTE: Options within the SCM Licensing tab may vary based on user, however the general process for applying a license to the Savant Host remains the same. Example images shown in this section may not match the SCM interface displayed for all users.
2.1. Acquiring a Savant Cloud-based License
3. Adding the Ring Profile to a Blueprint Configuration
Once the correct Profile for the chosen Ring Entry Video Doorbell or Security Camera configuration type has been selected, follow the steps below to add the Ring profile to the Blueprint configuration layout.
Within the open Blueprint configuration, select Show Library from the Toolbar.
Enter Ring into the search bar.
Select the matching profile and drag it into the Layout Pane.
Select the room/zone where the Ring device will be located and enter a Component Name for the Ring device. Select Choose when complete.
Locate the Ring device within the Blueprint Layout frame, then right-click the Ethernet port to show a list of available network components and ports to connect to. Select the appropriate component and port matching the physical connection on site.
IMPORTANT NOTE!: Do NOT add an IP address to the Host field within Inspector for the component.
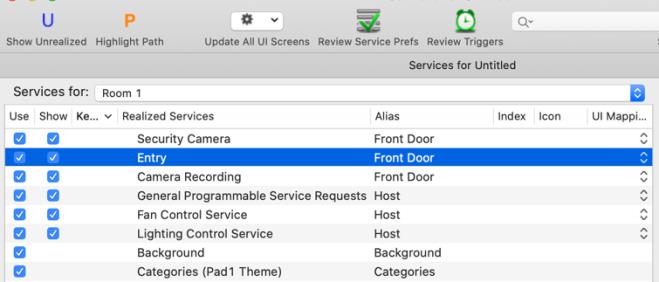
Select Generate Services from the Blueprint toolbar.
In the Services window that pops up, select the zone where the Ring profile was placed and confirm the correct Entry, Security Camera, or Camera Recording service has been created for the zone, with the Alias column showing the Component Name entered in step 4 above.
IMPORTANT NOTE! If the Ring Component name in Blueprint and the Ring device's name in the Ring app are the same, then the Savant Pro app will automatically match the name of the Ring device given within Blueprint to the device's actual native Ring app name when linking. This is recommended for ease of linking. However, if the Blueprint component name and the Ring app device names do not match, then manual selection is required.
3.1 Configuring the Entry, Entry Event Recording, and Security Camera Data Tables
With initial Component Profile placement and connections completed within the Blueprint layout, the Entry, Entry Event Recording and Security Camera Data Tables will automatically populate all of the corresponding information. Refer to the example image and descriptions to populate the data table following the steps listed below:
Navigate to Tools > Settings > Entry...
Fill out all applicable fields, then click Done. Refer to the example image and descriptions below.
Entry Name
The component name given for the Ring video doorbell entry device in Blueprint.
Serial Number
Not / Applicable.
Ring Duration
The minimum ring duration is 30 seconds and the maximum ring duration is 60 seconds.
Chime Sound
Set the desired Chime sound to be played from a touch-panel device.
Motion Event
Sets whether or not the Entry service registers Motion Events.
Noise Event
Not / Applicable.
Tamper Event
Not / Applicable.
Control
Custom buttons can be added to the Entry Service Screen in the Savant Pro App.
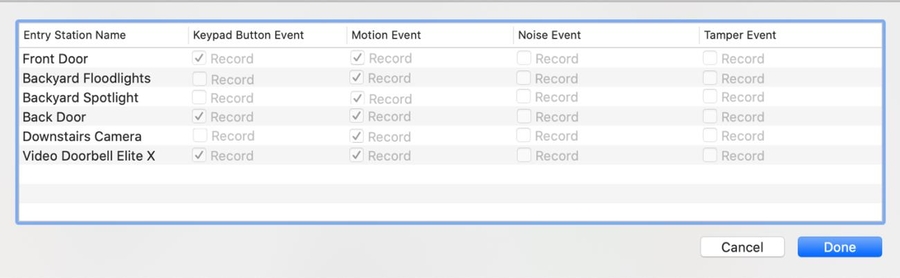
From the main RacePoint Blueprint menu, navigate to Tools > Settings > Security Camera Event Recording... to open the data table.
NOTE: The example image below is for reference only. Ring Security Camera Event Recording data table settings are set automatically and can not be changed.
Navigate to Tools > Settings > Security Camera... to open the data table.
NOTE: The example image below is for reference only. Ring Security Camera data table settings are set automatically and can not be changed.
Once complete, select Done at the lower right corner of the data table window to save settings and return to the main Blueprint view.
Save the configuration file and upload to the Savant Host by selecting the Upload to Master option from the main Blueprint toolbar.
4. Savant Host Ring Entry and Security Camera Linking
Once the Ring device is physically installed and blueprint configuration is completed, it must be linked in the Savant Pro App.
Open the Savant Pro App and log into an Administrator SCS user
From the Home screen navigate to Settings > Device Settings > Ring.NOTE: If this is not the first time using Ring with the Savant Pro App, skip to Step 6. Otherwise, tap the add user button in the top right and continue.
Enter in the Ring App User's credentials (email and password) and click Sign in.
Enter in the two-factor authentication code sent to the user's email address, enter the password again. Select Sign in.
A prompt requesting Savant permission to access Ring data will appear. Select Authorize
A list of UNLINKED Blueprint created Ring components is shown. Tap the component name then Link.
Followed by a list from the native Ring User's account, select the corresponding device. Select the Next button.
NOTE: The Blueprint Ring component name will be automatically selected to the native Ring Device if the names are the same.
Once the device has been linked, a Success message will be prompted stating that the Ring device has been set up.
5. Service Activation
Ring Entry and Camera services are found within the Savant Pro App and the Savant Touch Panels (ITP-E8000x and ITP-E5500x) under the Entry and Security Camera Service. All motion and live video clips will be displayed under both Entry and Security Camera service. The Ring Floodlight Cam, Spotlight Cam, and Stickup Cam Elite will only generate a Security Camera service.
Appendix A: System Monitor
This Appendix describes several aspects of System Monitor relevant to the Ring Entry and Security Camera devices. To open System Monitor from Savant Application Manager (SAM), select the System Monitor icon from the right side menu bar. Select the Host from the scanner window and double-click to connect.
System States
To view System States related to Ring Entry and Security Camera Devices, select System State from the left sidebar, and enter the Ring device name given in Blueprint into the search field.
To verify that the Savant Host component has been successfully linked to the Ring Cloud, refer to the state global.< RingDeviceName>.ControlIsConnected. The State Value displayed will be 1 if the Host is successfully linked to the Ring cloud.
System Licenses
Select the System Licenses tab from the left sidebar to view information on the number of Ring Feature (SFL-RING1-00) Licenses currently applied to the Host and in use as shown below.
IMPORTANT! The Ring Feature (SFL-RING1-00) License cannot be applied to the Host via System Monitor in the same way as a standard runtime license, and must be added via Savant Central Management (SCM). Refer to the Licensing section in this document above for details.
Appendix B: Audio Interrupt Service (AIS)
This section shows a basic example of using the EntryRing state from a Ring Video Doorbell Entry device to trigger an AIS doorbell. For more detailed information on creating an AIS trigger see the Audio Interrupt Service (AIS) Configuration for Doorbells on the Savant Customer Community.
In an open Blueprint configuration do the following:
Make an audio connection from the Host to the audio distribution system.
Generate Services.
Click Review Triggers.
Click the plus sign to create a new trigger. For more information on how to make an AISDoorbell trigger, see the Audio Interrupt Service (AIS) Programming Guide on the Savant Community Knowledge Base.
Appendix C: Ring Floodlight and Spotlight Cam Lighting Control
This section explains the process of integrating Ring Floodlight and Spotlight Cam lighting control into the Savant Pro App. Since lighting loads do not auto-populate, they must be configured to be displayed on the Security Camera and Lighting screen.
In an open Blueprint configuration do the following:
Make an ethernet connection from the Ring Floodlight or Spotlight Cam to a network switch and Generate Services.
Navigate to Tools > Settings > Lighting...
Click the (+) Plus button at the bottom left hand corner of the data table twice. An entity will need to be added for both SwitchOn and SwitchOff to control the light.
Fill out the data table as shown in the chart and example images below.
Location
Select the zone in the configuration where the Ring Spotlight or Floodlight is located.
Entity
Make the first entity SwitchOn, and the second SwitchOff.
Address 1
Set both SwitchOn and SwitchOff entities to 1.
UI Type
Set to Push.
Savant App Group
Set to Button.
Note: If this light is only desired in the Camera Service screen, and not on the Lighting Service screen, set Savant App Group to Hidden. The data table entry must still be checked as ENABLED for the buttons to appear on the Camera screen.
Lights are On
Uncheck Lights are On checkbox.
Savant App Scenes
Uncheck Savant App Scenes checkbox.
Appendix D: Entry Ring Doorbell and Motion Push Notifications
This section goes over creating Entry Ring and Motion push notifications in the Savant App Settings. Each SCS user must create and enable a push notification for Entry Ring if they want to be notified someone is at the door or when a device detects motion when the Savant App is not open.
IMPORTANT NOTES:
Notifications are not enabled by default and must be manually created following the steps below.
All Ring devices support Motion Push Notifications and not just the Entry Service/Doorbell Ring Devices.
To enable Doorbell and Motion notifications:
Open the Savant Pro app and go to the Settings tab in the top left hand corner.
Notifications > (+) Plus button> Entry.
Chose Entry Ring and/or Motion is Detected.
Select Next to configure Where, When and method of receiving notifications. Select Done.
A push notification will now be sent to the Savant Pro app when the doorbell is rung or motion is detected.
Appendix E: Motion Detection State Triggers
Motion Detection state triggers can be configured in Blueprint to turn on lighting loads, trigger an alarm, etc. In the example below, a trigger will be created to Turn On a lighting load based on the MotionDetected is True Boolean state value. For more information on how to make a trigger, see the State Triggers - RacePoint Blueprint Programming Guide on the Savant Community Knowledge Base.
In an open Blueprint configuration do the following:
Generate Services.
Click Review Triggers.
Click the plus sign to create a new trigger. The image below shows an example:
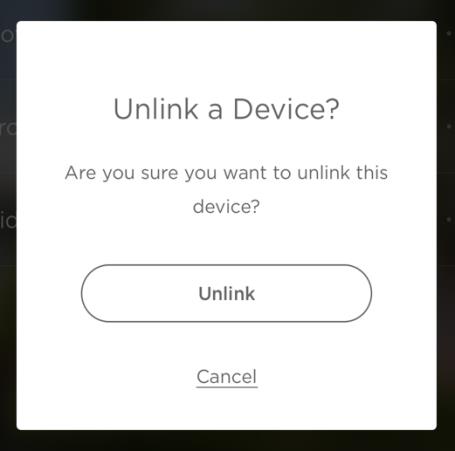
Appendix F: Unlinking a Ring Video Doorbell or Security Camera Device
To unlink a Ring device from a Savant Host, open the Savant Pro App and navigate to Settings > Device Settings > Ring to display the currently linked Ring devices.
NOTE: The unlink process should only be utilized when the Savant Host is being replaced, or in cases where the use of the Ring device is no longer necessary.
From the Ring Device Settings screen, select the Options icon (ellipsis) next to the desired Ring device to be unlinked.


 from the Toolbar.
 IMPORTANT NOTE!: Do NOT add an IP address to the Host field within Inspector for the component.


 Appendix C: Ring Floodlight and Spotlight Cam Lighting Control